> ## Documentation Index
> Fetch the complete documentation index at: https://docs.supaboard.ai/llms.txt
> Use this file to discover all available pages before exploring further.
# Schedule a dashboard report
> Send a recurring dashboard report with the right time, data slice, format, and recipients.
Use a scheduled report for a regular review, such as a Monday sales summary. Supaboard creates an automation that prepares and sends the report at the frequency you choose.
## Before you begin
Open the dashboard page you want to report on. You need access to the reporting action and permission to create the resulting automation. Decide who should receive the data and which period the report should cover.
## Configure the delivery
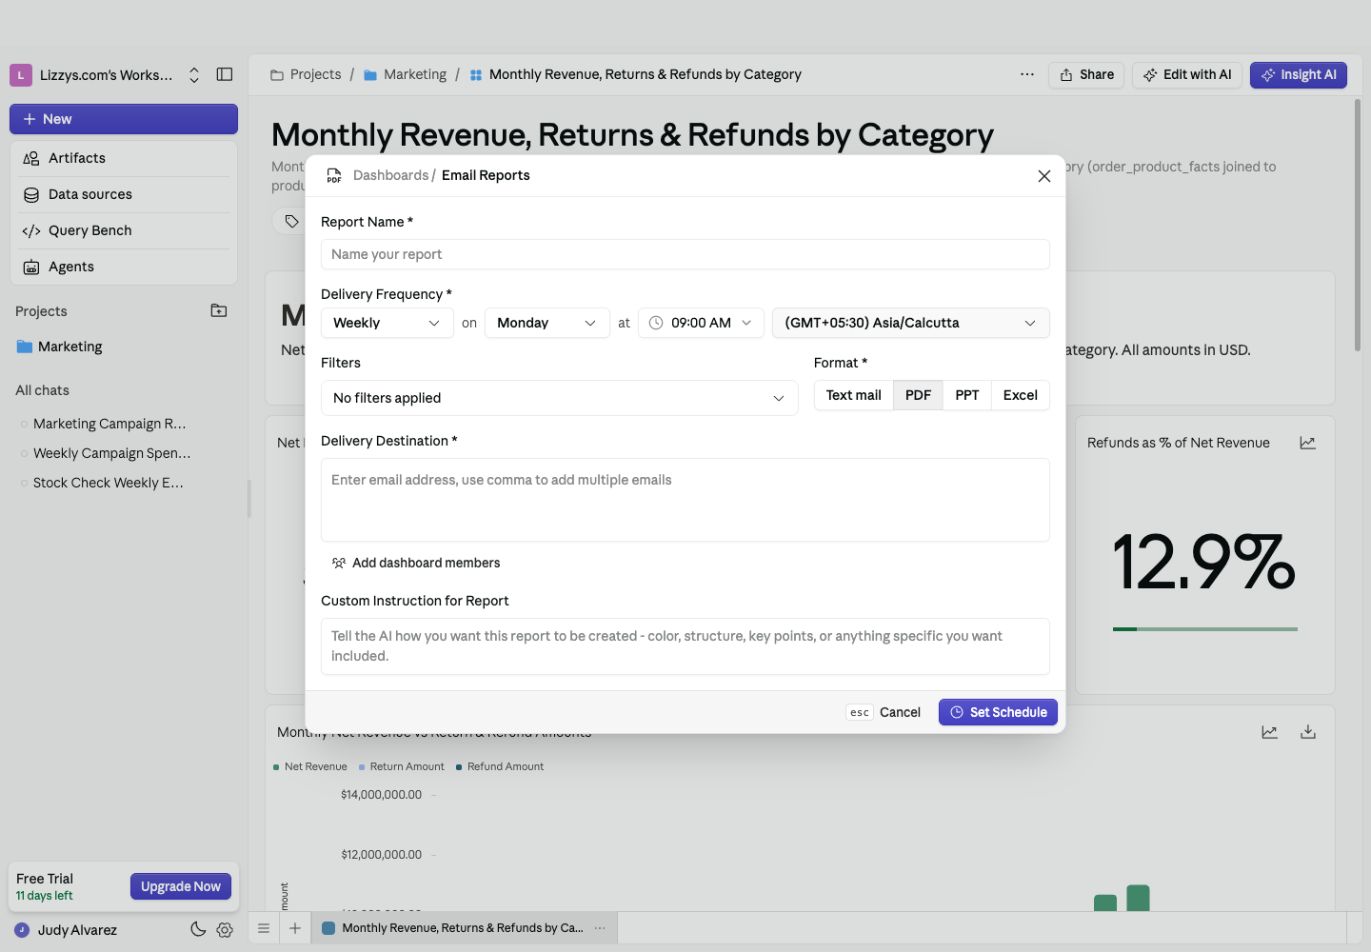
1. Open **More options → Email Reports** on the dashboard.
2. Enter a recognizable **Report Name**.
3. Choose **Hourly**, **Daily**, **Weekly**, or **Monthly** in **Delivery Frequency**.
4. Set the day or minute, time, and timezone shown for that frequency.
5. Set **Filters** for the report. A relative period is useful when each run should cover the latest week or month.
6. Choose **Text mail**, **PDF**, **PPT**, or **Excel**.
7. Add recipient email addresses in **Delivery Destination**. Review the list if you use **Add dashboard members**.
8. Add any **Custom Instruction for Report**, such as the key changes to explain.
 A useful instruction is: “Summarize the previous week's performance, compare it with the week before, and highlight the three largest changes. Include the period covered.” The filter configuration and the writing brief should describe the same period.
## Activate the schedule
Review the settings, then select **Set Schedule**. This creates and publishes the scheduled automation; it is the step that enables recurring delivery.
The confirmation provides an option to open the automation for further editing. You can also find it under **Artifacts → Automations**.
## Check a run or change the schedule
Open the automation to inspect its trigger, report steps, recipients, and run history. Review a completed run to confirm that the output covers the intended period. Pause the automation before making changes you do not want delivered yet.
Testing an automation can run its delivery steps. Use appropriate test recipients before running a flow that sends emails or calls another service.
## Expected result
The schedule is active, the automation appears in your library, and its run history shows the recurring report's outcome. If a run fails, open its details to identify which step needs attention.
## Next steps
Read the [automation guide](/automations/overview) for more complex flows, or [create a one-off report](/dashboards/how-to/export-dashboard-reports).
This documentation is built and hosted on [Mintlify](https://mintlify.com), a developer documentation platform.
A useful instruction is: “Summarize the previous week's performance, compare it with the week before, and highlight the three largest changes. Include the period covered.” The filter configuration and the writing brief should describe the same period.
## Activate the schedule
Review the settings, then select **Set Schedule**. This creates and publishes the scheduled automation; it is the step that enables recurring delivery.
The confirmation provides an option to open the automation for further editing. You can also find it under **Artifacts → Automations**.
## Check a run or change the schedule
Open the automation to inspect its trigger, report steps, recipients, and run history. Review a completed run to confirm that the output covers the intended period. Pause the automation before making changes you do not want delivered yet.
Testing an automation can run its delivery steps. Use appropriate test recipients before running a flow that sends emails or calls another service.
## Expected result
The schedule is active, the automation appears in your library, and its run history shows the recurring report's outcome. If a run fails, open its details to identify which step needs attention.
## Next steps
Read the [automation guide](/automations/overview) for more complex flows, or [create a one-off report](/dashboards/how-to/export-dashboard-reports).
This documentation is built and hosted on [Mintlify](https://mintlify.com), a developer documentation platform.